
Steven M. Jones, Extension Horse Specialist, University of Arkansas
Catching a horse safely and correctly is not so simple. Horses have keen sight and hearing and are sensitive to human touch.
Catching a horse calls for approaching the animal and properly placing the halter on the its head, following these stages:
- Organizing Stage: getting the halter ready.
- Approaching Stage: getting next to the horse.
- Haltering Stage: putting the halter on the horse.
Contents |
Organizing Stage
Catching begins by getting the halter and lead rope ready prior to entering the stall, pasture or paddock where the horse is located. Get ready by:
- Placing the unbuckled halter in the left hand with the crownpiece of the halter up.
- Placing the end of the lead rope in the first two fingers of the left hand with the end of the lead rope up.
Approaching Stage
This is the most important part of catching. If the horse is not approached calmly and confidently, it will be hard to catch. Approach the horse safely to avoid getting hurt. The horse can’t see an object closer than 4 feet in front of its face or an object directly behind the hindquarters, commonly known as the blind spot. The horse is especially sensitive to touch around the ears, eyes and nose. Care should be taken in approaching these areas. The approach is divided into five steps:
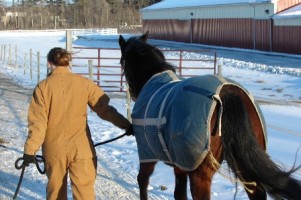
- Walking up to the horse’s left shoulder, speaking to it calmly and making sure it sees the person.
- Firmly placing the right hand with the lead rope on the horse’s left shoulder.
- Sliding the lead rope over the neck until 1 or 2 feet of rope is hanging on the horse’s right side.
- Moving the lead rope up the neck, then grasping both parts of the rope together with the right hand.
- Rotating the rope in a clockwise direction so the right hand and the end of the lead rope are at the top of the poll.
Approach Safety Precautions
-
Never approach the horse:
-
- From the front at the head because this is a sensitive area to touch and the horse can’t see objects or people clearly.
- Directly from the rear because the horse can’t see and may kick.
- At the hip because this will cause the horse to move forward, resulting in his not being able to see the person.
-
Speaking to the horse is reassuring to the animal and ensures that it sees the person approaching.
Haltering Stage

The halter is in the left hand. The right hand is at the poll holding the lead rope to keep control of the horse. Move the halter under the horse’s neck so the right hand can grab the crownpiece and place it over the poll. Then slide the noseband up and over the horse’s nose. Finish by fastening the crownpiece to the buckle on the halter. Be sure the noseband of the halter is about 1 1/2 inches from the cheekbone.
Leading
Leading Position
It is important to lead a horse correctly to keep control of it and avoid being run over or stepped on. To lead a horse, take a position on its left side, between the head and shoulder. Have the right hand on the lead rope about 8 to 10 inches below the snap. Keep some slack in the lead rope so the horse can carry its head in a natural position. The left hand holds the extra lead rope folded in a figure eight.
Safety Precautions
-
- Never wrap the lead rope or bridle reins around hands, wrist or body.
- Always turn the horse to the right to avoid being stepped on.
- Should the horse pull back suddenly, do not rush to the horse’s head or grasp the halter. This will frighten the horse and may cause it to pull back and resist more.
- If the horse rears up, let go with the hand closest to halter, hold onto the folded end and wait for the horse to calm down. Then, return to the original position.
To move the horse forward, give a slight pull on the lead rope in a forward direction. At the same time, give a low clucking sound, then stop pulling as the horse steps forward. Using light pressure, continue pulling and releasing until the horse is moving steadily. Think of releasing as a reward for the horse complying with your request. The horse should walk or trot alongside
the person, not behind. It should not lead the person. To stop the horse, pull with the right hand and lead rope back toward the horse’s chest, stop walking and say “whoa.” Do not pull down on the lead rope because this pulls the horse’s head down and out of position.
Tying
Once the horse is caught, tie the horse to something that is safe, secure and solid. Use the quick-release knot, and tie it so the knot is at least as high as the horse’s withers. In all cases, the safety of the horse will depend on its willingness to stand when tied. The first lessons in tying horses should be provided by a 4-H leader, trainer another experienced handler.
Safety Precautions
-
- Do not tie the horse to fence boards, wire fences, gates, wobbly or rotten posts, cars or machinery.
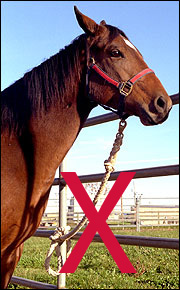
- If a horse is pulling back on the lead rope while tied, approach to the side and back of the shoulder to urge the horse forward. Do not approach the front, which may cause the horse to pull back more.
- When the horse is tied, do not work around its head from the throat latch forward. The head is very sensitive and the horse may pull back.
- Always tie with a halter and lead rope – never tie with bridle reins, rope or twine.
The Natural Cues
Cues are the signals by which the rider tells the horse what to do. They are signals which the horse must be taught to understand and obey. These are natural cues — hands, legs, seat or weight and voice. No special equipment like whips or spurs is required.
Hands
The hands communicate the rider’s commands to a well-trained horse by applying pressure or contact to the horse’s mouth. The horse can respond in several different ways, depending on the kind of pressure or
contact. The hands can ask the horse to stop, help control the horse’s speed or ask the horse to turn.
Riders may have heavy hands, passive hands or controlled hands.
- Heavy hands typically disturb the horse. This is usually the result of an unsteady seat or the fear that the horse will get out of control.
- Passive hands are light but ineffective. Passive hands belong to riders with a good balanced seat but little knowledge about riding a horse.
- Controlled hands are quiet but effective. These riders combine the use of hands and legs. Controlled hands get the desired results without upsetting the horse.
Legs
The rider’s legs communicate motion to the horse. Squeezing with both lower legs will make the horse go forward. If the horse is properly trained, leg pressure, combined with proper contact on the horse’s mouth, will produce the following types of movements:
- Straight forward motion
- Sidepass (horse moves sideways)
- Haunch turn (horse pivots on its hindquarters)
- Forehand pivot (horse pivots on its forequarters)
- Bending (horse bends its body to the inside of a circle)
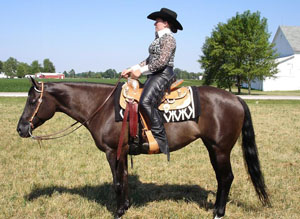
Seat (Weight)
Slight shifts in the rider’s weight help the horse in going forward, backing or sidepassing. When the rider’s weight shifts slightly forward, this helps the horse in moving forward. If the rider’s weight shifts slightly back, this helps the horse in backing. It is important to learn how to sit naturally and softly and to use body movements in harmony with the movements of the horse. Remember to use only slight shifts in body movement, not exaggerated weight shifts that may throw the horse off balance.
Voice
The horse will also learn to respond to voice cues such as “walk,” “jog” (trot), “lope” (canter) and “whoa.” It is important to use the voice quietly but firmly. The horse has a very good sense of hearing, so never yell or scream. The noise may frighten it.
Application of Cues
Always apply the lightest possible cue that will get the horse to respond. Do not jerk the horse’s mouth or kick the horse’s sides. The cues applied on a trained horse should be almost invisible to the observer but clear and definite to the horse. Each cue should include the complete harmony of the rider’s hands, legs, seat and voice. For the best performance from the horse, all cues are properly timed together, not each one by itself.
Walk
To get the horse to walk:
- Maintain a slight amount of contact on the horse’s mouth.
- Squeeze with the calves of both legs.
- Shift body weight slightly forward.
- Tell the horse to “walk.”
Once the horse is walking:
- Release the leg pressure.
- Release a little of the pressure on the horse’s mouth.
Jog or Trot
To get the horse to jog or trot:
- Maintain a slight amount of contact on the horse’s mouth.
- Squeeze with the calves of both legs, using more pressure than for the walk.
- Shift body weight slightly forward.
- Tell the horse to “jog” or “trot.”
Once the horse is jogging or trotting:
- Release the leg pressure.
- Release a slight amount of pressure on the horse’s mouth.
Lope or Canter
To get the horse to lope or canter in the balance, it must be on the correct lead. A horse that is circling to the left (counterclockwise) must be on the left lead. A horse circling to the right (clockwise) must be on the right lead.
To get the horse to lope or canter on the left lead:
- Maintain a slight amount of contact on the horse’s mouth.
- Apply leg pressure with the right calf, slightly behind the girth.
- Shift body weight slightly forward. Do not shift weight to the left.
- Tell the horse to “lope” or “canter.”
To get the horse to lope or canter on the right lead:
- Maintain a slight amount of contact on the horse’s mouth.
- Apply leg pressure with the left calf, slightly behind the girth.
- Shift body weight slightly forward. Do not shift weight to the right.
- Tell the horse to “lope” or “canter.”
Once the horse is loping or cantering:
- Release the leg pressure.
- Release a slight amount of pressure in the horse’s mouth.